Southern-style and Gluten free

Check it out!

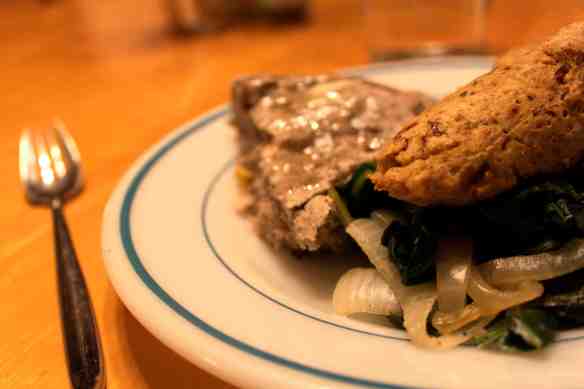
This whole meal is weird. In a good way! First, I made gluten free cornbread (using the Happy Herbivore recipe, but subbing in Bob’s Red Mill Mix for the regular flour and adding 1/4 tsp xanthan gum). But it couldn’t be just regular old gluten free cornbread–no!–I made it blue! With blue cornmeal! And it was awesome!

Then I had the challenge of creating vegan sausages gluten free. I’m sure I’ll work on perfecting this, since they came out a little bready, but it was still pretty terrific. I just used Orgran gluten free gluten substitute for all of the vital wheat gluten in the recipe (save two tablespoons–I added that much chickpea flour). So, yeah, the texture was much more like bread than I’m used to, but overall it was very similar to regular vwg sausages.

And then I just laid it over some swiss chard, collard greens, onions and a little garlic, ginger and red pepper flakes. That’s the best and easiest and awesomest way to make any kind of greens, fyi. So tasty!

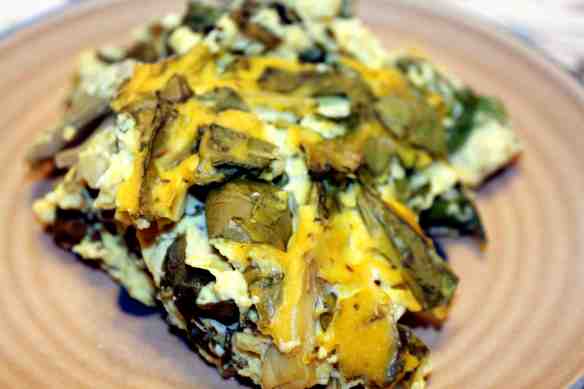
Spinach & Artichoke Frittata

First, I’ve gotta say it: Thank you, Happy Herbivore, for finally making an artichoke recipe. What is it with vegans and artichokes? I love them, and I hardly see any one using them. It’s a real shame.

This recipe comes from the brand-new Everyday Happy Herbivore, and I couldn’t be more impressed by it. The creaminess of the mori-nu tofu is amazing. I couldn’t believe I wasn’t eating eggs and cream! The turmeric gave it just the right yellow color (but not too yellow) and the artichokes and spinach were so smooth. I think there was something a little lacking in flavor in this one, but I think it’s my fault: I had frozen, plain artichoke hearts (which I used) instead of the marinated ones. I think the recipe was really depending on you choosing those. It also needed a bit of salt, but that was an easy fix.

I would love to make this again, and my brain is spinning with the flavor possibilities. Roasted brussels sprouts and leeks! Red peppers, capers and grilled eggplant! Just think of the whole world of frittata that’s opened up right before your eyes.


Sweet, Sour & Spicy Meatballs

Isn’t it funny when you make something as an afterthought, and it ends up being the best part of the meal? I’d planned on making Orange Scented Broccoli and Scallion Potato Pancakes from Appetite for Reduction, but I couldn’t think of a third item for the plate. Our meal needed a little more protein, but I was stumped. I didn’t feel like tofu, seitan, or beans. What was I to do?

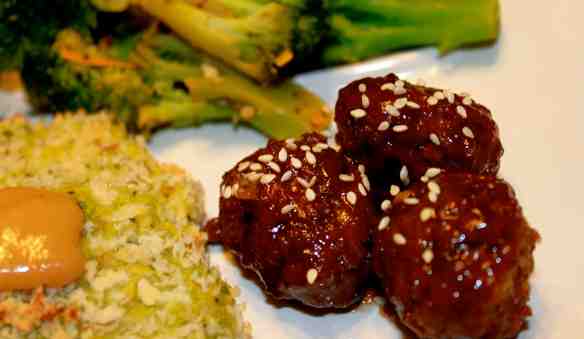
On our weekly trip to Trader Joe’s, I purchased both chickenless chicken nuggets and meatless meatballs. When I got home, I realized the nuggets had egg in them (bummer!) but the meatless meatballs were indeed vegan. I’d been thinking of making orange “chicken” as the missing piece of this meal. But–no dice. So, sweet, sour, spicy and altogether wonderful meatballs to the rescue! I literally threw this sauce together in 5 minutes, shoved the meatballs in the toaster oven, and that’s about it. And they were awesome. Amazing. Almost indescribably perfect. Really! I suppose that sounds like I’m tooting my own horn, but for all the effort I put into these, I think this recipe came from Divine Providence instead of my own brain.

Does God give out awesome meatball recipes? I guess so!

Sweet, Sour & Spicy Meatballs (makes enough sauce for 12-15 meatballs):

  • 12-15 vegan meatballs (you can cook the Trader Joe’s ones from frozen, check your recipe or other brand for different info)
  • 3 T Bragg’s Liquid Aminos (or low sodium soy sauce or tamari)
  • 2 T dark brown sugar (maple syrup would also work)
  • 1 T sweet chili sauce
  • 1 T ketchup
  • 1/4 tsp habanero hot sauce (or any sweet hot sauce will work)
  • 1 tsp chili garlic sauce
  • sesame seeds for garnish

Mix all the ingredients except the meatballs in a small mixing bowl. Add the meatballs and stir to coat. Heat oven to 350 degrees. Pick up individual meatballs on a fork and place on a sheet of foil on top of a cooking sheet. You want them to be coated, but not dripping, with sauce. Save the rest of the sauce in the bowl and set aside.

Bake meatballs for 10 to 12 minutes, then return to the bowl. This time, you can pour out the sauce and meatballs together back on the same piece of foil, and return to the oven for another 2-3 minutes. This gives the sugar a chance to get really gooey, and make a nice thick coating on the outside of the meatballs. Garnish with some pretty little sesame seeds.

If you want to make a ton more, I’m pretty sure this recipe will expand out make as many meatballs as you want. However, I’d caution about adding a lot more liquid aminos/soy sauce. That can get pretty sodium-filled pretty fast. You can always use water or veggie broth if you need the sauce to stretch a bit further. Just use common sense, because too much water could make it bland.

If you were wondering about the other parts of dinner–they were great! I made the broccoli completely incorrectly (I added basically everything at the wrong time) and it seemed pretty fool-proof. The scallion cakes should have probably been thinner, but I’m hoping that they toast up nicely for lunch tomorrow.

E2: Chalupas

The name chalupa scares me, because all I think of are creepy tacos from Taco Bell, and a small dog insisting that I try them. Anyone else remember that? I’m terrified of Taco Bell because of both their mystery ingredients, and the way their food makes me feel after I eat it. UGGGGH.

But the Chalupa recipe from the Engine 2 Diet was undeniably amazing. Really. Of course I made a few changes to it (easy, easy changes). But I can’t express the joy this dinner brought to me. One bite of it was like being a kid again, at some favorite mexican restaurant with my family, eating something simple that a child would love: tortillas, refried beans and lettuce. See? Completely simple and easy.

So, to review the changes (or “upgrades” as I like to think of them) to this recipe:

  • Use two corn tortillas (I got a 12 pack from Trader Joe’s that were great) and sprinkle a tablespoon of cheddar daiya cheese in between. Then, broil following the steps in the book.
  • Salsa isn’t necessary. At all. I just topped ours with some additional green onion, lime juice and Tapatio. That’s all you need.

See? I’m pretty sure I actually made this easier than the original recipe, since you don’t have to go to all the trouble of making fresh salsa, or destroying this with jar salsa (ugh!). Also, I know this was a total success because my husband did not suggest that I put green chilies on it, and he wants green chilies on EVERYTHING.

Braised Potato Leek Soup

I’ve always wanted to have my own recipe for potato soup, since it’s one of my favorite things to eat. And it’s one of those foods you absolutely can’t get from a can–the texture is too slimy, the flavor tinny. I’ve attempted this soup before, but always with tons of cream and butter–so it left me feeling heavy.

Hello, veganism.

What gives this soup a rich flavor is braising the leeks, celery, carrots, onion and garlic before putting in the other ingredients. It has a creamy texture and sweet flavor, but no cream. Or butter. Just veggies and happiness.

Braised Potato Leek Soup (makes about 10 servings):

  • 4 small leeks (or 4 cups of leeks), chopped (the smaller the leek you get, the better the texture and flavor)
  • 1 small red onion (peeled and cut in half)
  • 6-8 cloves of garlic
  • 1 cup baby carrots (or a cup of diced carrot)
  • 1 cup chopped celery
  • 1 head of cauliflower, roughly chopped
  • 2 large yukon gold potatoes, or 3 average-sized ones (roughly chopped)
  • 2 cups veggie broth
  • 3 cups unmilk (I used rice milk)
  • 1/2 to 3/4 tsp salt, depending on your preference
  • chives or scallions to garnish
  • salt and pepper to taste

Get out a large soup pot. The largest one you have! Heat 1 tsp of oil (or spray with cooking spray) over medium heat. Add the leek, onion halves, garlic, carrots and celery. Cook over medium heat until the leeks begin to brown (about 5 minutes). Add the cauliflower, potatoes and 1 cup of broth. Cover and cook until all the veggies are very tender.

Now, this is the tricky part, because the soup is HOT! But you’ll want to put portions of soup in your blender and puree until smooth. If it needs a little help getting smooth, add the rest of the broth as you puree. The finished mixture should be the texture of very loose mashed potatoes. Lower the heat to a simmer and put the soup back in the pot. Add all the unmilk and the salt. Return to a uniform warmness, but not to boiling.

Garnish with chives or scallions, add salt and pepper to taste. If you happened to have some fake bacon bits on hand, this would be a great time to use them!

Chocolate Chocolate Pancakes

Don’t we all need double the chocolate in our pancakes?

I adapted this recipe from the basic pancakes in the Happy Herbivore. That is the best starting point for pancakes I’ve ever seen–you can basically add anything to it, and they come out great. Blueberries? Sure! Flax? Yes! Pumpkin? Probably. But this time I added both cocoa powder and chocolate chips to make it extra, extra chocolaty.

Chocolate Chocolate Pancakes (makes approximately 8 to 10):

  • 1 cup of flour (I use ultragrain flour)
  • 2 T cocoa powder
  • 1 T baking powder
  • dash of cinnamon
  • 1 cup vanilla soymilk
  • 2 T maple syrup
  • semi-sweet chocolate chips (reserve)

Follow the directions in the Happy Herbivore cookbook, which are basically: mix all the dry ingredients, then add the the wet. Mix gently and let sit for 10 minutes. You can heat up your skillet while you wait.

Now, grab your chocolate chips! When you pour the batter into the pan to make the pancake, add 4 to 5 chocolate chips on the top. When you flip the pancake, the chips will be incorporated in. You don’t need very many, and this way you can easily control how much chocolate goes into each pancake, instead of having some with none, and some with TONS.

I topped ours with raspberry jam and powdered sugar. But for Christmas, I think it would be adorable to make a peppermint glaze (out of unmilk, powdered sugar, and peppermint extract) and top with some crushed candy canes. I think you could even do an adorable chocolate orange pancake (you could even use orange-flavored chocolate!), or one with blueberry syrup.

Black Bean Salsa Dip

I was trying to make a sort of black bean hummus with this recipe, but failed to realize that the liquid-to-bean ratio would make it distinctly wetter than hummus. No worries! It tastes great, is essentially fat-free, and is easily scoop-able on a chip.

Black Bean Salsa Dip (makes…3 cups? I forgot to measure and I ate a ton of it):

  • 1 15-oz. can of black beans (or two cups of cooked beans)
  • 2 T onion, roughly chopped
  • 2 cloves garlic
  • 1 medium-sized tomato, roughly chopped
  • 1 T cilantro
  • 1  jalapeño
  • juice of one lime
  • 1 tsp red wine vinegar

Add all ingredients to your food processor or blender and pulse until smooth. Enjoy!


Roasted Tomato Tortilla Soup

I didn’t come up with this soup in a vacuum. It’s really a crazy mash-up of two different tortilla soups that I really like, one from the Happy Herbivore, and the other from Appetite for Reduction. I just took the two easiest parts of each recipe and put them together into one terrific soup!

Roasted Tomato Tortilla Soup (makes 4 large servings, or 6 small servings):

  • 1 large onion, chopped
  • 4 cloves of garlic, minced
  • 1&1/2 tsp chili powder
  • 1 tsp dried oregano
  • 1 tsp cumin
  • 1/4 plus 1 cup veggie broth (keep a little more on hand if you need to thin your soup)
  • 1 28oz. can fire roasted whole tomatoes
  • 1 4oz. can green chilies
  • 2 tsp liquid aminos
  • 3 T tomato paste
  • 1 tsp agave nectar
  • 2 tsp hot sauce (I like Tapatio here)
  • 1 cup pinto beans
  • 1 cup crumbled baked corn chips
  • 1/2 cup frozen corn
  • cilantro to garnish

Place a medium-sized sauce pot over medium-high heat. Add 1/4 cup veggie broth and onions. Cook until onions are translucent, about 5 minutes. Add garlic and spices, stirring to coat. Now, douse with the rest of the veggie broth, the juice from the tomatoes, the green chilies, liquid aminos, agave nectar and tomato paste. Squeeze each of the tomatoes in your hand, then add to the soup. Lower to a simmer, and you can cook the soup for almost any length of time–I’d recommend at least 20 minutes.

Pour the soup into your food processor or blender when you are ready and pulse until combined. The soup will be HOT so take pains (ha) not to burn yourself. Return it to the pot, and add the corn chips, pinto beans, corn and hot sauce. Once they are nice and warm, the soup is ready to serve. Garnish with cilantro.

Chocolate Banana Walnut Oatmeal Cookies!

Have you ever had Laura’s Wholesome Junk Food? I love that stuff, but especially the banana chocolate cookie version. If you followed that link, you’d know my sadness–they no longer make it! And while I don’t think these cookies quite live up to Laura’s yet, they are really easy to make, and cost a lot less than $5.99 a batch!

Chocolate Banana Walnut Oatmeal Cookies (makes 13 cookies–a baker’s dozen!):

  • 1 really ripe banana, mashed
  • 1 T applesauce
  • 1/4 cup dark brown sugar
  • 1/4 cup maple syrup
  • 1 T ground flaxseed meal
  • 3 T unmilk
  • 1 tsp vanilla extract
  • 1 cup rolled oats
  • 1/2 cup flour
  • 1/2 tsp cinnamon
  • 1/4 tsp baking powder
  • 1/4 cup chocolate chips
  • 1/4 cup walnut pieces

Mix the applesauce, sugar, syrup, flaxseed, unmilk and vanilla in a medium mixing bowl. There will probably be a few banana lumps–don’t worry about them, as long as they aren’t huge. Now, add the oats, flour, cinnamon and baking powder to the bowl, and mix until combined. Fold in the chocolate chips and walnuts until evenly incorporated.

Drop cookies onto a parchment lined cookie sheet, and bake in a 350 degree oven for 12-15 minutes. It’s important to slide them off of the cookie sheet and onto a baking rack when done, so the bottoms don’t steam and get super soft. Let them cool fully before eating, or they will turn into a gooey blob in your hand. Yummy!


E2 Week: BBQ Pizza

I will say that someone thinking they want to try the Engine 2 Diet should carefully examine if they like bell peppers. Because I’m pretty sure bell peppers figure into every single meal, in varying amounts. I’m not super fond of them myself, but on this pizza they were fantastic. I think the trick is to make those really fine slices, so the flavor isn’t so intense.

I learned two things from making this pizza: 1) mixing tomato paste with BBQ sauce makes the best pizza sauce EVER. EVER. I think I’m going to make all of my pizza sauces tomato paste based. 2) You can totally make pizza crust out of sweet potatoes. That’s right, sweet potatoes.

Sweet Potato Pizza Crust (enough for 1 large pizza):

  • 1 cup mashed sweet potato
  • 4 T applesauce
  • 1 T maple syrup
  • 1 T apple cider vinegar
  • 2 tsp ground flax seeds
  • 1/4 teaspoon salt
  • 3/4 cup all-purpose flour
  • 1/4 cup fine cornmeal
  • 1 tsp baking powder
  • 3 T unmilk

Mix all of the wet ingredient except the unmilk in a medium-sized mixing bowl. Then, add the salt, baking powder, flour and cornmeal, and stir until barely combined. Now, douse it with the unmilk, adding more if it seems too dry.

This is the trickier part–getting it spread out into dough. I’m still not sure my technique is awesome, but here’s what I did: I put a sheet of parchment paper over my pizza pan (you can use a cookie sheet, don’t worry), plopped the dough in the middle, then placed another sheet of parchment paper over that. Then, using my hands, I spread the dough around until it was flat and reached the edges of my pan. However, this did result in some areas being not as thick as others. I think in the future I’ll strategically place the dough so that I can get a more uniform crust. Also, if you can, flip it over. The bottom parchment was very wrinkly, where the top was smooth. So–smooth out both sides.

Then, parbake the crust in a 400 degree oven for 10 minutes. It shouldn’t be all the way cooked, but should peel easily off of the parchment when finished.Here was my mistake number 2: I think I should have greased the pan, and peeled off both sheets of parchment before putting the toppings on. I left the bottom sheet of parchment paper on, and the crust came out slightly damp, and not as firm on the bottom as I would have liked. Either that, or I could have placed the crust on the bottom of the oven (in the pan, of course) like Vegan with a Vengeance recommends. So, that part is up to you.

The best part is that you end up with a very healthy crust with no added oil, but with some delicious fat from the flax seeds. And it tasted perfect with the BBQ sauce topping. I might use something like actual potato if I didn’t want a sweet crust for my pizza, or even a rutabaga. I’ll let you know about those experiments as they progress!